


The hubs and I have been sleeping in college-student-style since we got married nearly 10 years ago (you know, metal frame and a mattress, but no headboard, footboard, or real furniture). That was fine for the first 7 years because we were students, but hubs graduated almost 3 years ago and our bedroom has not graduated from it's student style. BUT NO MORE! We bought our first home a few years ago and most of it is pretty grown-up and decorated. Except for that darn master bedroom. Surely it has been painted twice since we moved in and our plain bed(mattress) has been wrapped in several new quilts and comforters in hopes to give it that grown-up look, but that's about as far as we've made it. Those virgin walls have never even seen a nail, poor things. There are just about a majillion other things ahead of our bedrrom on the list of BIG $$ to be spent. In fact, I don't think our master bedroom even made it on that list. What is it about the master bedroom that makes it the last on the list of rooms to decorate and adorn?
This past week I have spent my extra minutes between changing diapers and folding laundry, scouring the web for DIY headboards, specifically upholstered ones. There is quite the plethora out there and here I am adding my own experience to the load of them.
Here's my list of products and prices for my queen size upholstered headboard...
1/2" thick plywood cut to 24" x 60" -the hubs picked this up for me and he's not one for remembering details, but he thought that it was right around $20
2" thick high density foam -Joann's had it on sale for 50% off. It is regularly $28.99/yd, but on sale I got mine for $25. I called ahead first to find out what dimensions it came in which was what was the deciding factor on doing the headboard at 24" tall. So I got 24" x 60" to fit the plywood backing.
Batting lowloft -reg 12.99 at Joann's, but also on sale for 50% off so $6.49 for me with a lot of extra left over for another project.
Cover button kit- I needed 12 buttons for the tufting I had planned and they came in sets of 4. So I bought 1 kit for $3.29 that came with 4 buttons and the clever tools for covering them and then 2 sets of just 4 buttons for $2.29 each. Total for buttons of $7.87.
DMC embroidery floss to match fabric covered buttons for the tufting $0.37.
Long needles- I bought "Doll needles" with one at least 4" long to reach through the 2" of foam and the 1/2" plywood. $3.79
Tacky Spray to adhere foam to plywood (from what I read this is not always necessary, but I didn't want to take any chances)- $6.99
Fabric for covering the headboard- you need the size of your plywood dimensions with at least an extra 4 inches on each side for wrapping around the back and stapling. I bought a natural linen curtain panel on clearance at Target for $12.49
Staple gun- at first we bought a fancy one from Walmart, but when we tried it out at home it didn't drive the staples in all the way so we returned it for the cheapest one and that one worked fantastically, go figure. I think it was like $10
Staples for your staple gun- maybe $3 at most
Assuming you are starting from absolutely nothing and need to purchase all supplies .... $96.00!!!!
First thing you want to do is mark your holes for the tufting. My board was 24" tall by 60" wide. I figured that I wanted two rows of buttons for square tufts. My measurements worked out to be 10" in from the sides and then 8 " squares. Hmm, ..... maybe a diagram would explain better.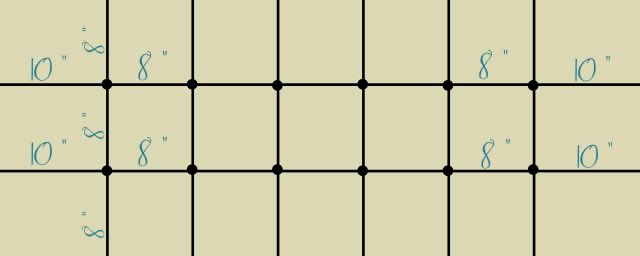
Anyway, mark your holes and then drill them. After you have drilled them on one side, flip your board over and drill through on the other side for a nice clean hole that you can easily get a needle in and out of.
Attach your high density foam to your plywood. I used tacky spray and I sprayed the plywood and the side of the foam that would be against the plywood to form a good bond. Trim any excess foam with scissors so that your foam is flush with the sides of the plywood. If you have time you can let it sit for 30 minutes to dry, but if it's all one piece of foam then I don't think drying time is absolutely necessary. However, if you are working with more than one piece of foam on your board then I would definitely recommend waiting the drying time.
Now you can lay out your batting on a smooth surface being sure to straighten it out and smooth out any folds or wrinkles in it. Lay down your foam and board top of the batting, foam side down. Starting on one side of the board, staple in the middle and work your way to each end. I stapled mine just about an inch onto the board and about 1 1/2" - 2" apart. Next do the side opposite of the one you just did starting in the middle and working your way out to each end being careful to not pull it too much. You want it to be tight, but if you pull it too tight then you don't get a smooth, crisp edge, you'll get a messy, scalloped-looking edge. I saved the top of the headboard for last to make sure that it was smoothed out exactly right. I did my corners like hospital corners when you are making a bed. Just try to get the fold and crease right on the corner and you'll be fine. The batting is kind of the practice run for the fabric so you can even play around a bit to see what will look best for the next next and final layer.
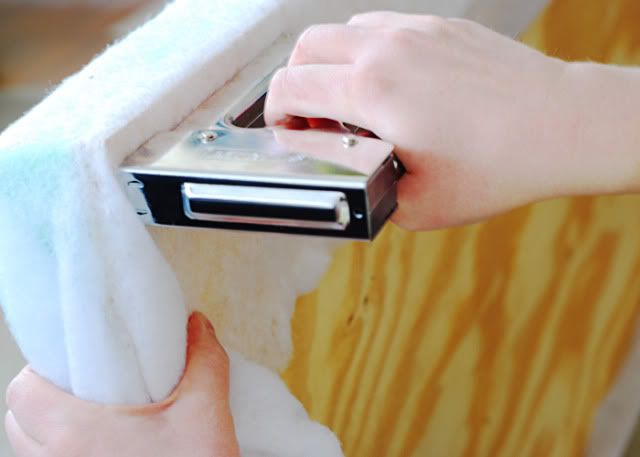
Trim within 1/2" of your stapled edge.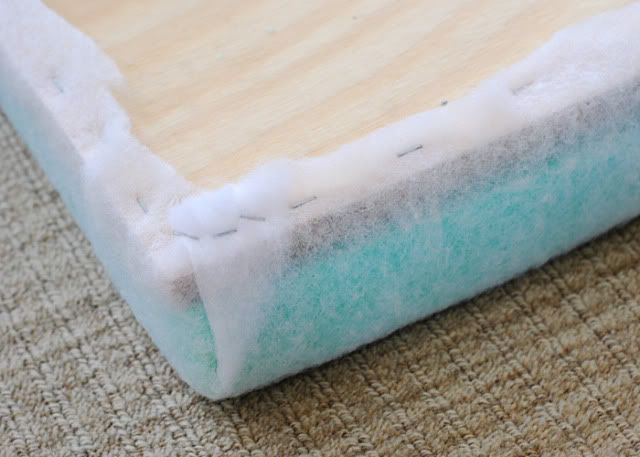
Next lay out your smooth and ironed fabric on your flat surface and lay your board down on top of it, batting side down.

This is me really concentrating because I was sure that this was going to be so much harder than it turned out to be.
. Do the same thing you did with your batting by starting in the middle of one side and working your way out to each end. I stapled about 2" onto the board so that it smoothly covers the batting (not that anyone will ever see the back, but it looks nicer and lays smoother). Stop stapling about 4-5" away from the corners so you have room to fold them nicely before securing them down.
Now turn it over and admire your work.

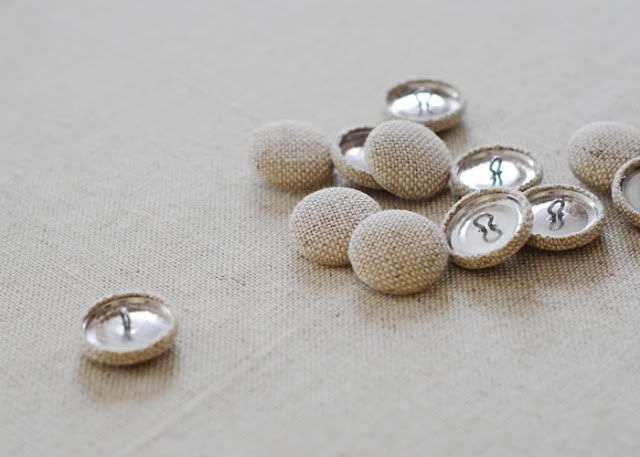
Now you get to cover your buttons. I was all prepared for this to take F.O.R.E.V.E.R! I set aside 2 hours the night before project day just to get my 12 buttons ready. I was really disappointed when it only took me less than 10 minutes to do all 12. Seriously, this was fun! I have been thinking about all sorts of other projects that I can do now that would require covered buttons because I really want an excuse to do it again! Seriously! Follow the instructions on the back of the kit. It's too super easy and they're cute-as-can-be when you're all done.
So now we're ready to begin the tufting. Cut your DMC floss (all 6 strands together) to about 24" in length and as many times as you have buttons. Thread your needle and insert it through your drilled hole in the back straight out the front. Don't pull it all the way through. Leave at least 6-8" hanging in the back. Thread your button over your needle. I wrapped the thread around my button twice for a little extra strength and then put the needle back through the same hole that it came out of. *this was the trickiest part of the entire process. Sometimes you get lucky and your needle goes straight out the back first try and sometimes you get stuck and have to feel around with it for several minutes before you find your drilled hole again. Good luck with that.
Once you have your needle out the back again you can take the needle off the thread and grab both ends of the thread and pull taut. Pull both off one direction and staple and then pull the opposite direction and staple again and then tie a good double or triple knot with both ends and then pull the opposite direction and staple right up against the knot to keep it from slipping. I was really worried about if it was going to hold, but somehow all this directional pulling and stapling really holds it so you just need the knot for a little extra security. Now clip your ends and move on to the rest of the buttons. Be sure to pull them all equally as taut as you go along. This gets pretty difficult by the last two or three because your fingers feel raw and tired and they cry out in pain, but you can do it. You can!

You are done! Voila! 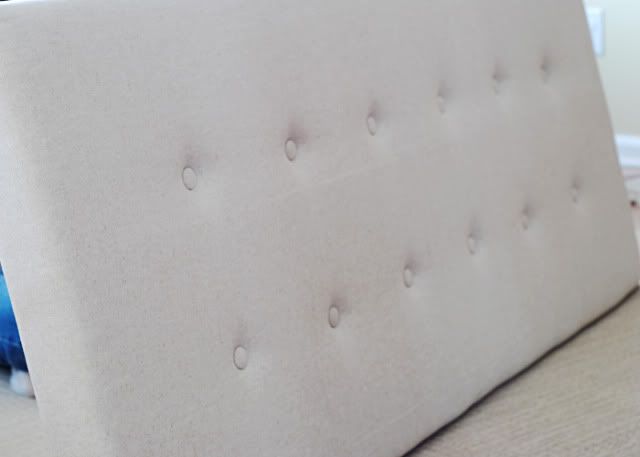
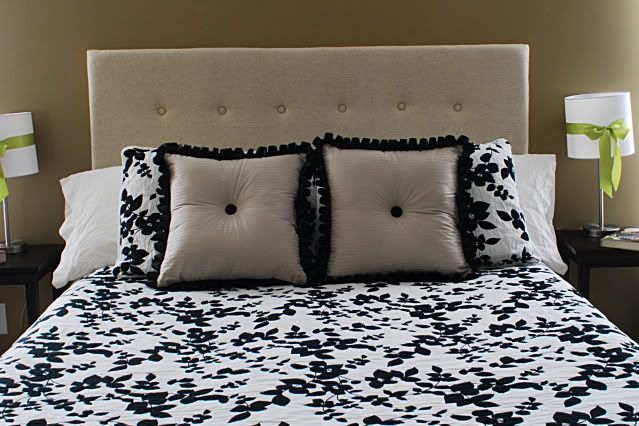
A beautiful custom headboard that looks incredible and maybe you don't need to replace your bedding after all! The hubs is super happy about that money-saving idea!

No comments:
Post a Comment